
Flower Forest Level 45 Answer
For Flower Forest level 45, the answer is D, B, H, F: bring the red lantern columns together until the gaps make an even grid. Match the four numbered gaps to the letter positions, then enter the result and use the flower control.
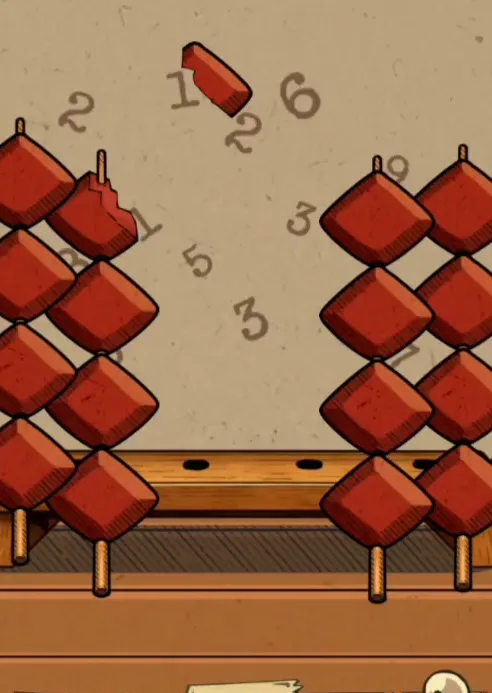
Red diamond-shaped lanterns hang in tall groups at either side of a wooden bench. Faint brown numbers are scattered across the pale background between them. Each group has a slender pole projecting below its lowest lantern, and an isolated red fragment appears near the top. The bench rests over wooden floorboards, with several dark holes visible along its upper surface.
Bring the Poles Together
Look at the heights of the lantern rows before concentrating on the faint numbers. Straight rows make the spaces between the columns into a usable three-by-three pattern instead of scattered patches of background.
- Drag the lantern-bearing poles inward from their separated starting positions.
- Adjust the columns until their four red lanterns line up at matching heights.
- Locate numbers 1 through 4 in the interior gaps and compare those spaces with the parchment grid.
- Tap D, B, H, F in sequence and finish by pressing the flower button beside the letters.
Move a column as a group, keeping your attention on its pole and the stack of red diamonds above it. In the finished arrangement the top lanterns share a row, and the lower lanterns repeat the same spacing down to the bench. Uneven columns leave the numbers apparently floating beside random red edges. Bringing them into line turns those loose marks into clues with definite places inside a larger square.
There are four lanterns across and four down, but the useful spaces lie between them. Count the interior gaps instead of counting every red object as a possible answer button. You should be able to compare three rows of openings with the three rows of letters below the scene. This comparison explains why moving the poles matters: it fixes the location of each numbered opening so you can translate it into a letter.
Video: level 45 red diamond lanterns from start to finish
Compare the inward movement of the lantern poles with your own arrangement, especially the final row heights. Follow the numbered-gap solution through the letter taps and the flower beneath its dome.

Read Between Red Diamonds
Number 1 sits in the middle-left opening, which matches D on the parchment. Number 2 belongs to the top-center opening for B, while 3 is at bottom center for H and 4 is at middle right for F. Read those numbers in increasing order rather than moving across the lanterns. This is a location clue: the red diamonds provide the boundaries, and the pale spaces hold the information needed for the taps. The digits do not ask you to enter numbers themselves.
Only four of the nine spaces are numbered for the answer, so leave the other letter positions out. In particular, the central gap corresponds to E but does not become a tap merely because it sits in the middle of the picture. The route your eyes take between numbered gaps can jump upward or sideways; that is expected when numbers set the order. Once you have matched all four, return to the parchment and keep their sequence unchanged during entry.
Fix Uneven Lantern Rows
A common misreading is to look for a letter drawn on each red lantern. The useful marks are much less bold: the small numbers on the background between the stacks. If they still seem to sit outside the arrangement, check the horizontal spacing and the height of every column. The goal is a regular array that gives each numbered gap a clear place, not simply four poles standing somewhere on the bench.
Another error comes from choosing letters as soon as you notice a number, before considering its place within all nine gaps. A mark at middle left means D because of the whole grid, not because it is near the leftmost pole. Read the complete arrangement once before entering anything. If a tap disappears, keep track of the sequence you intended; the disappearing letter is a response to touching the parchment, not a separate confirmation of your interpretation of the lantern clue.
Frequently Asked Questions
Which letters solve Flower Forest level 45?
D, B, H, F solves the red lantern puzzle when followed by the flower button. The letters come from the numbered spaces inside the aligned lantern array. Arrange the columns first so you can locate the gaps clearly, rather than trying to read the scattered digits while the poles are still separated.
What do I move in the red lantern scene?
Move the poles carrying the red lantern columns toward an even arrangement on the bench. Each column has four diamonds, and their heights need to match those of the neighboring columns. You are arranging the groups so the spaces between them form a regular pattern that can be compared with the letters below.
How do the lantern numbers turn into letters?
The numbered gaps match positions on the letter grid: 1 is D, 2 is B, 3 is H and 4 is F. Use increasing number order to decide your taps. The surrounding red lanterns define those gaps, while the unnumbered spaces have no place in this four-letter sequence.
Should I count the lanterns or the openings?
Use the openings between lanterns to read level 45. Sixteen red diamonds outline nine interior spaces, matching the nine letter positions on the parchment. Counting the red objects alone misses that relationship. Once the rows are straight, concentrate on the four spaces containing digits and leave the other positions unused.
Does a vanished letter mean my lantern answer is right?
A vanished D or another letter only means that you tapped it on the parchment. Every chosen letter disappears, including an incorrect choice. To finish the lantern scene, keep the complete four-tap order and use the flower control afterward; the flower under glass is the sign that the puzzle has been solved.
Read next



The letter order for every level is in one table on the Flower Forest answers for all levels page. Official store links are on the download page.