
Flower Forest Level 15 Answer
The seven taps for Flower Forest level 15 are A, B, E, F, I, H, G: slide the pink patterned sheet over the blue one to expose the tile route. Start at the upper left and follow the connected path toward the lower left. Submit those seven letters with the flower control after reaching G.
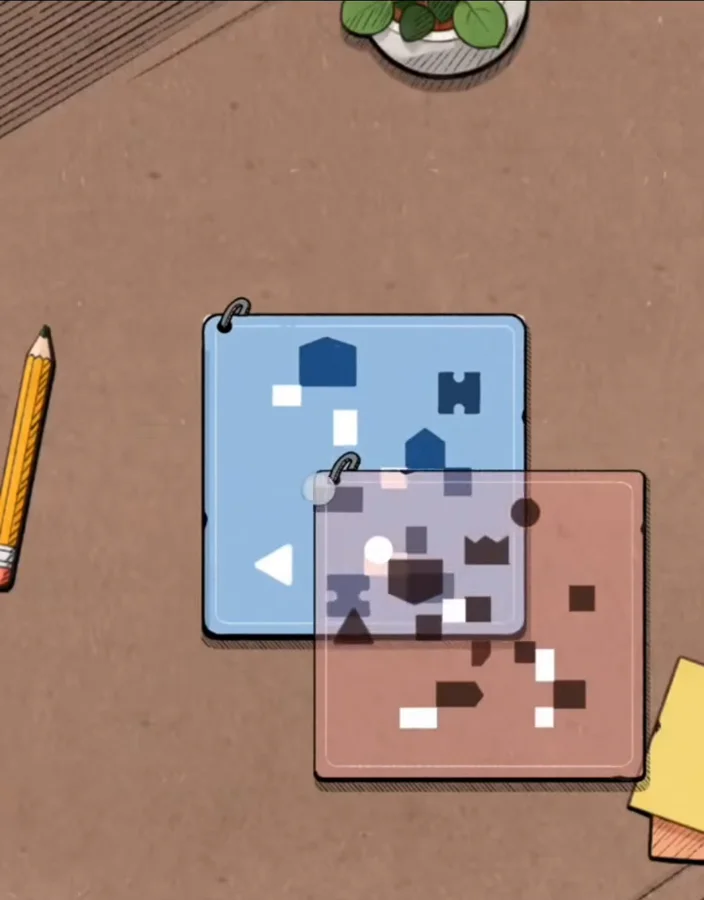
Two square patterned sheets partly overlap on a brown tabletop, with the pink sheet lower and farther right than the blue one. Dark symbols and small pale tiles cover their surfaces. A yellow pencil lies along the left edge of the picture. Part of a leafy potted plant appears above the sheets, and colored paper corners show at the lower right.
Overlay the Patterned Sheets
The two patterns need to share the same square before you follow their pale tiles. Begin by bringing the offset pink sheet fully over the blue one, rather than reading either sheet separately.
- Drag the pink patterned square onto the blue square until the two sheets align.
- Locate the connected white and pink tile path in the combined pattern.
- Follow it from the upper left corner, keeping to the connected route until the lower left.
- Tap A, B, E, F, I, H, G consecutively, then press the flower to complete the level.
The starting overlap is incomplete, so parts of the two designs are still separated on the table. Sliding the pink sheet over the blue brings their markings into one combined view. The path depends on that alignment rather than on a single loose symbol. Keep your attention on the pale tiles after the squares coincide, since those are what form the route.
The dark shapes make the sheets look busier than the route itself. Read the connected white and pink tiles as one path instead of assigning a letter to every symbol you notice. You need a continuous way from one corner to the other, with several turns in between. A jump across an unrelated dark shape is a sign that you have lost the connection and should look back at the previous tile.
Video: level 15 two patterned sheets from start to finish
Compare the square alignment with the pink sheet movement, then follow the seven letter taps along the completed route. The playthrough reaches the flower enclosed in a glass dome after the final check.

Trace Seven Connected Cells
Match the upper-left start to A on the parchment. The path moves right to B, drops into the center at E and turns right again to F. These first four cells explain why the nearby top-right C is skipped. The route leaves the top row at B instead of continuing across all three top letters.
From F, the next destination is I directly below it. The route then runs left along the bottom through H and finishes at G. Although the start and finish both sit on the left side, the path travels through the center and right before coming back. D is skipped because the route reaches the bottom-left end from H rather than moving straight down the left column.
Skipped Cells and Turns
If the pale tiles do not make one path, check the overlap before trying to interpret the symbols. Two partly offset squares still contain separate pieces of the pattern, so an early reading can create a false gap or turn. Bring the pink square fully onto the blue and inspect the joined result. The pencil and the plant help identify the table scene, but they do not supply extra route steps.
Another tempting shortcut is A, D, G because it connects the upper-left and lower-left corners directly. That misses the actual turns through B, E, F, I and H. Follow the connected tiles rather than the shortest distance between the endpoints. Leave C and D unselected when the seven-cell route is complete, then press the flower control.
Frequently Asked Questions
What is the level 15 patterned sheets answer?
The patterned sheets answer is A, B, E, F, I, H, G. Align the pink square with the blue one and follow the pale tile path from its upper-left beginning to its lower-left end. Enter the seven visited letter positions in that order, then use the flower button to check the completed sequence.
Which sheet should I move to reveal the route?
Move the pink sheet onto the blue sheet to reveal the route for A, B, E, F, I, H and G. It begins lower and to the right, with only part of the design overlapping. Bring the squares into alignment before tracing tiles. Reading one separate pattern misses the path made by the two together.
Where does the combined tile path begin?
The combined path begins at the upper-left tile, matching A on the letter grid. Follow its connection to B and then down to E, rather than reading the full top row. The route keeps turning before reaching the lower-left finish at G. Start and finish describe its ends, not a straight line between those two corners.
Why are C and D missing from the solution?
C and D are missing because the sheet path does not pass through their cells. It turns downward at B to reach E and later enters G from H along the bottom. The sequence therefore uses seven letters rather than all nine. Including an unused neighbor changes the route even if you return to the right cell afterward.
What happens if I tap C or D on level 15?
Tapping C or D adds an unwanted letter to the sheet answer and makes that letter disappear. Both should remain unused after the seven route letters have been entered. Check that you followed every turn from A through G, then use the flower control. Leaving two letters untouched helps check the selection count, but the order still matters.
Read next


The letter order for every level is in one table on the Flower Forest answers for all levels page. Official store links are on the download page.