
Flower Forest Level 117 Answer
Flower Forest level 117 needs C, F, I, B, G, A, D, E, H after you add the loose bones to the stick shapes and complete nine digits. The older scene with two soccer tactics clipboards uses A, C, H, I after their dot patterns are overlaid.

Nine pale squares sit inside a twisting wooden frame on brown ground. Short brown sticks form incomplete shapes inside the squares, and white bones lie underneath the board. The lower right square has three horizontal sticks beside a vertical white bone shape. Leaves, grass, stones and part of a small skull surround the puzzle.
Complete the Bone Digits
Look for the missing strokes in each brown shape before choosing a loose white piece. The bones supply the remaining parts of numbers, so their lengths and corners matter more than the order in which they lie below the board.
- Compare the loose bone shapes with the unfinished brown strokes in the nine squares.
- Drag bones into the squares to complete the digits, including 4 at upper middle and 8 in the center.
- Finish the whole board and locate the squares marked 1 through 9.
- Tap C, F, I, B, G, A, D, E, H, finishing the sequence at the flower button.
Some cells need only one straight addition, while others need a piece with several joined strokes. The short slanted stick at the upper right becomes part of 1 when its vertical bone is added. In the center, the brown arch becomes the top of an 8 once its lower white strokes are in place. Matching these gaps is more useful than trying to turn every brown shape into a letter.
The lower row helps check the result: it must contain 5, 9 and 3. A partial figure can resemble another number until the last bone closes a side or adds a lower stroke. Finish placing the loose pieces before deciding the order of the squares. Once they are complete, the puzzle changes from fitting shapes to finding the next number on a fixed board.
Video: level 117 bones and sticks from start to finish
See the white bones fill the unfinished stick numbers and compare the final nine-cell board with your arrangement. The solve continues through the ordered taps and ends with the flower in its glass display.

Count Across Cell Positions
Read by increasing digit value, starting at 1 in the upper right square and then finding 2 at middle right and 3 at lower right. Those three squares correspond to C, F and I on the parchment. The next value, 4, occupies upper middle and gives B; 5 at lower left gives G. This is why moving across a row of the completed board would produce the wrong answer.
Continue with 6 at upper left for A, 7 at middle left for D, 8 at center for E, and 9 at lower middle for H. The white and brown strokes together make each digit; neither color should be read alone. Their color difference is useful while fitting pieces, but the final number uses the complete outline inside one square. Keep the count from one to nine even when the next square lies on the opposite side of the board.
Two Tactics Clipboards
If your level has two soccer tactics clipboards on a green tabletop, use A, C, H, I. This older scene is solved by overlapping the diagrams rather than building numbers out of bones.
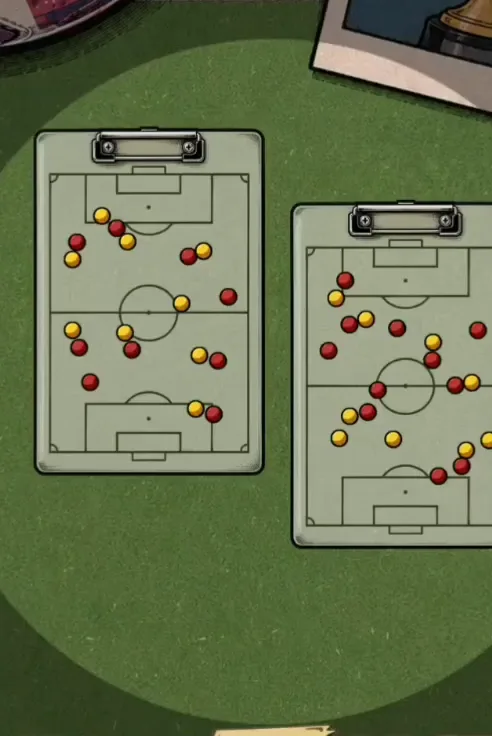
- Drag one clipboard over the other to overlap their red and yellow dot patterns.
- Inspect the combined diagram for the marked letter positions.
- Choose A, C, H, I, then use the flower button to finish this clipboard version.
Each separate board carries only part of the dot arrangement, so compare the combined picture after bringing them together. Its four-letter solution belongs to the tactics boards, while the bone board needs nine taps. Under the updated numbering, the clipboards appear on level 135.
Finish Before Counting
Brown strokes such as the upper left open shape can look like letters before the bones are added. That resemblance is a trap because the completed board is made of digits. The upper left becomes 6 and is visited sixth, even though it is the first cell you meet when reading across. Give every square its missing white strokes before using its position.
Another mistake is counting only the white pieces or treating them as a second set of clues. The pale bones and brown sticks are parts of the same numbers. Read one complete digit per cell and find its matching parchment place. If your picture has red and yellow dots instead of a wooden grid, switch to the separate clipboard solution above.
Frequently Asked Questions
What is the bones-and-sticks answer on level 117?
C, F, I, B, G, A, D, E, H is the bone-board answer. Complete the numbers using the loose white pieces and read their cell positions in increasing value. The first three digits run down the right side, giving C, F and I before you move elsewhere on the board.
How do I make numbers out of the brown sticks?
Fit the loose white bones into the gaps around the brown sticks in each cell. The joined colors form a single digit, such as the center 8 or upper middle 4. Continue until the board contains all nine numbers, since unfinished strokes can look like letters or different digits before their missing parts are added.
What order should the completed number grid have?
The grid is 6, 4, 1 on top, 7, 8, 2 in the middle, and 5, 9, 3 below. For entering letters, visit those cells by number value rather than by row. That starts at upper right with 1 and finishes at lower middle with 9, corresponding to the final H.
How do I solve the older clipboard picture?
Overlap the two tactics clipboards and use A, C, H, I for that older picture. Their red and yellow dot patterns combine into a clue after one board covers the other. The nine-letter bone solution belongs to the newer scene, so first check whether your screen contains bones or soccer diagrams.
What happens after a wrong tap on the bone puzzle?
The selected letter disappears, even if it is wrong for the bone-board sequence. A missing letter therefore marks a tap rather than proof that the choice was correct. Start your entry again with C and follow the digit positions carefully; finish with the flower control after the ninth letter, H.
Read next
The letter order for every level is in one table on the Flower Forest answers for all levels page. Official store links are on the download page.